ORGANIC GARDENING: PART TWO
Planting and Early Eating
Lanie DeMars, Adventure 212 Bistro Manager
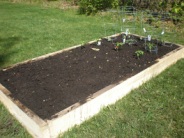
Pride isn’t a bad thing, is it? I am feeling mighty proud of myself right now. It was two full weekends ago that my husband and I put in our raised beds, and I haven’t killed anything yet! Things are really growing now, and it’s so exciting to watch (so much more fun than watching grass grow!). Here’s what we did with some pictures along the way.
 Building the Raised Beds
First, we figured out in our yard where the sunlight was the best. We want as much sun as possible, especially afternoon sun. Although the front yard is technically the best sun, I decided to put the beds in the backyard right corner, which also has pretty good sun. The other priority in positioning was the gardens had to be in the line of fire of our automatic sprinkler system. I hate fighting and wrestling with hoses, and I know myself too well to think that I will do that every day when I could just hit a button to water my garden.
Next, I talked to my friend, Jesse Suchowski, Maintenance Supervisor (and construction man extraordinaire) at Adventure 212 Fitness. He recommended building the raised beds with wood (as opposed to plastic) about 2” thick with 8” wide pieces. As far as garden dimensions, my husband and I built the beds so they are 4’ wide (good for reaching the middle of the garden from either side) and 8’ long. We made sure the edges were square, and ended up just using long screws to hold the sides together. You could make it as high as you want, but we ended up just going 8” high. We used an all-natural wood because, according to Jesse, there is less chance of rotting and no chemicals have been used on the wood. In fact, he recommended getting wood directly from the lumber yard, which we did. Jesse also recommends using a bracket in each corner of the raised bed for stability, galvanized so that it won’t rust and degrade with time and water.
Once the frames were built and even, we left them in place and dug up the sod. Turns out my neighbor had a patch of yard that grass wouldn’t grow last year, so he was thrilled with this donation. After the grass was removed, we loosened up the dirt underneath about another 12 inches or so. Then the fun part: we then filled it up with our black, purchased, dirt. After we watered the dirt to make it level, it was time to get planting!
 Planting the Crops
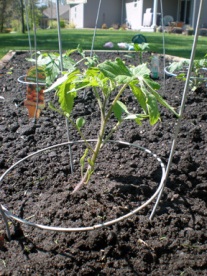
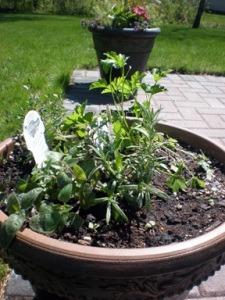
Remember my list of vegetables and herbs I wanted to grow? I cut it back substantially when I realized how much space everything would really need to grow well. I have two beds, but in total, I only have 64 square feet of garden space. This is what we have now: lettuce (variety), onions, chives, basil, dill, more lettuce, zucchini, yellow squash, butternut squash, peas, beets, even more lettuce, 6 types of tomatoes, 4 types of peppers, and marigolds. I also planted two blueberry bushes, 6 strawberry plants, rhubarb, and pumpkin seeds nearby, but not in, the garden. On my patio, I did a few flower pots, and then one herb garden in a pot, with parsley, dill, basil, oregano and rosemary.
I got a head start by planting a few seeds a month or so ago. I started the lettuce, a couple beets, and a couple each of zucchini, butternut squash and yellow squash. My technique was probably not perfect….I used whatever containers I could find…a styrofoam cup, a well-washed plastic hamburger package, and a waxed cardboard butter box (probably wouldn’t use this again, it sort of decomposed as the plant grew). We had such warm and sunny weather this last month, and my house doesn’t get a ton of sunlight inside during the day, that I actually kept the seeds outside for most of the time, except when it was supposed to freeze. (Okay, one time I forgot to move them in for a freeze.) It was so much fun for me and my toddler girls to watch the seeds grow—we felt powerful, magical, and as if we had something to do with this little part of the circle of life. The little girls and their Dora watering cans may have been a bit enthusiastic with the watering of the seeds, but I think all but one or two seeds survived the deluge!
When we finished building the beds, I stuck the itty bitty seedlings, as well as a TON of other seeds into the garden. I must say, it was nice to see something green in there right away….but now, three weeks later, you can hardly tell the difference between my seedlings and the seeds I sowed directly. (That’s fancy gardener talk for planting the seeds right into the dirt, instead of into an old Bistro or Starbucks coffee cup first.)
What you can tell the difference of, however, are the plants I bought. I bought the 6 varieties of tomato plants, the four pepper plants, the blueberries and strawberries–and I was given some chives and rhubarb. They are leafy green skyscrapers compared to my seedlings, and the growth in those in the last couple weeks has been in inches! As of now though, the only two things in my garden that are edible are rhubarb and chives. So I’ll include two of my favorite recipes using those ingredients below.
A Note on Predators
Oh sure, Thumper is cute. Bunnies are cuddly and adorable—but they are a gardener’s worst nightmare! My strawberry plants have been literally mowed to the ground by bunnies (little green nubs of berries and everything!), and I’m sure I won’t see one cotton-picking berry off of those plants. But, knock on wood, the bunnies and other dreaded predator—Bambi—haven’t YET discovered my gardens. Raised garden beds help deter some feasting, but they certainly don’t prevent it. Note: my berries weren’t in my garden. They were in a separate patch directly on the ground.
An all natural bunny antidote I’ve read about is to fill an old milk jug with 1 tablespoon of Tabasco, and fill the rest water. (LABEL THIS WELL, I guess it’s really hot, even diluted.) Fill up a spray bottle with your spicy water, and spray the area around your plants, like the grass around your garden, especially where you’ve seen bunnies eating before. They don’t like spicy foods and will stay away from this area. Repeat a few nights in a row, and you’ll change their pesky rabbit habits.
As far as deer, I’ve read about a few methods: fencing, loud noises, spicy sprays, human hair (put in a cloth bag and hung near the garden), dogs, or just planting things they don’t like. Things will work differently from area to area, but as long as you’re spraying to prevent bunnies, this might work for the deer too.
 Recipes
The Best Rhubarb Dessert
(Source: Evelyn Braun, my husband’s grandmother)
Fruit Ingredients:
4 c rhubarb, cleaned and chopped
½ c sugar
1 T flour
1 package strawberry jello, dry
Mix the four ingredients in bowl, and set into 9×13 baking dish.
Crumble Topping:
1 c flour
1 c oats (old fashioned)
2/3 c brown sugar
¼ t cinnamon
¼ t salt
½ c butter (softened)
Mix crumble ingredients all together, and sprinkle lightly over fruit filling. Bake at 350° for 45 minutes.
Chive Flower Omelet
(good for breakfast, lunch or dinner)
Ingredients:
4 eggs
4T milk or cream
Salt and pepper to taste
2 T minced chives
3 T butter
6-12 chive blossoms, washed and dried
1 T parmesan cheese, or feta, or goat cheese—whatever you like
Dollop of Crème Fraiche or Sour Cream
Melt butter in frying pan. Mix chives, eggs, milk, salt and pepper (use a blender if you like, or a whisk), and pour into hot butter. As the edges of the omelet begin to set, lower heat and use a spatula to turn the uncooked eggs to the bottom to cook. Sprinkle the chive blossoms and cheese on half of the cooked eggs, fold in half and cook another minute or so. Serve with a dollop of sour cream or crème fraiche, and fresh fruit.

Leave a comment